You can check out these sites for hints and tips for wedding colors and schemes.
http://www.tulleandchantilly.com/blog/25-hot-wedding-color-combination-ideas-and-bridesmaid-dresses-trends-to-rock-your-big-day/
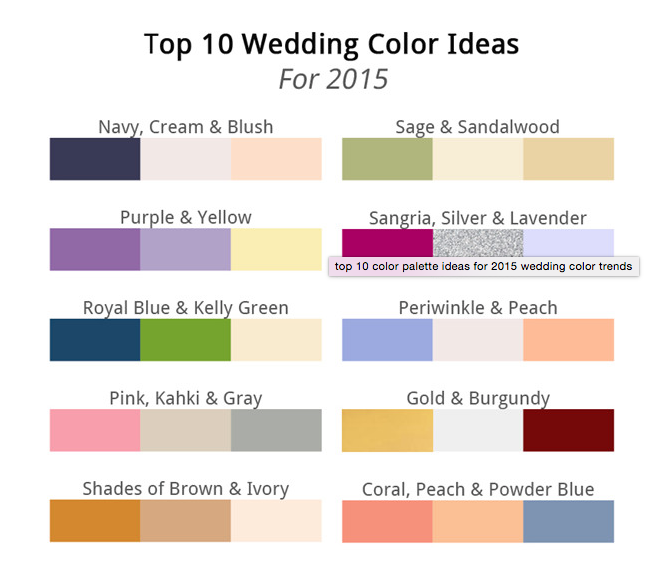
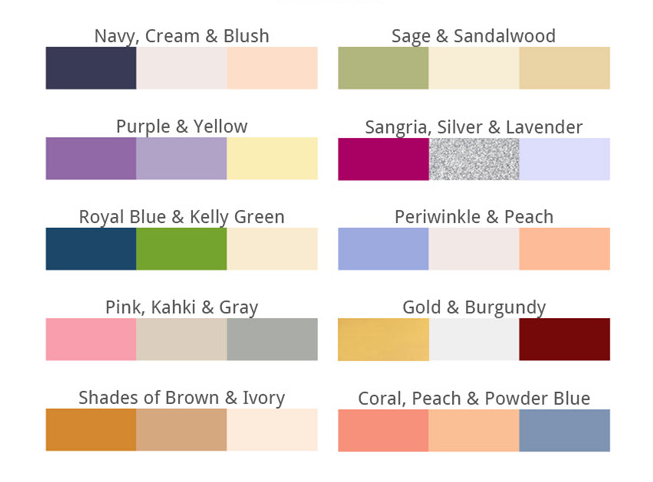
https://www.elegantweddinginvites.com/top-10-wedding-color-scheme-ideas-2015-wedding-trends-part-one/
0 Comments
Well...I guess an old dog can learn a new trick! I never gave much thought about bobby pins, except that I know when I had hair-do's that required them I used a lot...that's why they come in packs of 80. While doing a little research, I discovered just how wrong I was. I imagine its a quite common for most people to not understand the use of the mistifying bobby pin, so I thought I should share.
I did some poking around on the internet to find the which wedding colors are hot for the new year. Keep in mind, JLO Specialties can make hair pieces is most of the colors listed below.
In Part 4, I am going to show you how to make candle rings and wreaths. Again this process is very simple. This is also a great idea for a rustic wedding or holiday wedding centerpiece.
I bought a wreath for my front door when I first moved in my home, 12 years ago. It was on clearance and was still $29…but it was such a pretty wreath. About 4 years after purchasing it, it started losing its pizzazz. The one I purchased had fake fruit with a glitter shell which started cracking and falling off. The bad thing was, the way it is constructed, if I tried to change anything out of it (remove the fruit) it will rip it apart...everything is glued in with super industrial glue. I usually use wire to attach most of my embellishments so that if they get aged or damaged it is no problem changing them out.
In parts 3 and 4, how to use the needle sections of the artificial tree. Most artificial trees I have seen are basically 'pipe cleaner' style needle sections attached to metal rod that 'plugs' into a 'pole' or into the trunk. Part 3 and 4 are very similar ideas that result in different looks. In Part 3, I will show you how to make a 'pine garland' from your old christmas tree.
You can also wrap the needles directly on a light string (use same technique for wrapping as in Part 4-Wreaths/Candle Rings). After doing so, I found two potential problems…but these may not have any bearing on your project. The plaster of my walls does not like to hold anything. Nails and push pins tend to pull out quite easily. The light string wrapped with the needles is quite heavy and stiff, so it is difficult for me to get it to stay on my walls. And secondly, I have bad luck with light strings. Each year I lose about 1/3 of my strings…for no apparent reason…they just don't work anymore. I realized after I wrapped the one string, if something went wrong with lights, I would have to remove the needle sections and put them on a new string.
I found some pretty cute ideas to dress up the holiday dinner table. The following YouTube videos are different napkin folding techniques to enhance your holiday ambiance. I think my favorite is the Christmas Tree. The next one is for paper napkins
Another decorating tip, you can wipe the pine tips with glue (or use spray adhesive) and dip into glitter or snow flakes. You can also use a sponge dipped in paint to add color to the tips (like gold, silver, white….whatever). This one is much fancier. It is called the "crown". Definitely a way to spruce up that holiday or wedding table. Brought to you by eFavorMart.
Thank you to all my friends and family for their support. I could not do it without them. And remember Thanksgiving, Black Friday and Cyber Monday sale going on now on at my Etsy Shop and Online Store!
This is a simple and useful way to fold a napkin…a silverware pouch brought to you by eFavorMart.
through my ideas this morning deciding what I wanted to share…I decided on the info on veils. As I was looking over the link again, I realized it only tells how to wear. So a the logic progressed, you can't wear it if you don't know what style you should wear…you can't choose a veil style before you find your dress….and so on. So this is the first in a short series that I am going to call Bridal Basics. And today's share is "How to Choose a Wedding Dress'. The Wikihow page I found is quite informative on choosing a wedding dress style to suit you.
There are a many ways to use a napkin ring holder. This short video demonstrates a simple yet elegant way. Again, video brought to you by our friends at eFavorMart. When my daughter was a baby, we had her bassinet in our living. I would sleep on the couch next to the bassinet at night and she took all her daytime naps in it until she outgrew it. One afternoon, she had just fallen asleep. I needed to use the restroom, which we have a powder room off our living room. I opened the door and the door let out this loud slow "CREAK!" She started to stir. I quickly went down to our basement where my husband keeps all his tools and such and looked for the WD-40 only to be disappointed. We were out. So then the light bulb appeared…cooking spray. So off to the powder room armed with butter flavored Pam. Of course, an oil is and oil and it worked. The next time the door started squeaking, my husband sprayed with WD-40…and I realized how much I disliked the odor. So now, for things with low friction that are in the house (mostly doors), I use cooking spray instead of WD-40. I actually learned this a long time ago when I had a pet mouse. Mice or hamsters and their wheels and night…good grief! Using cooking oil is safer because the mice will lick and gnaw whatever you put on the wheel as a lubricant. I thought about sharing this today because I went out onto my porch and my storm door hinges started creaking this morning. Even though this is an exterior door, I opted for the cooking spray because we have a very curious puppy who chews and licks everything. And no sooner did I spray the hinges, she was out trying lick and chew them. So the tip of the day, for a temporary squeak or one where chemicals could be harmful to exposed children or animals, cooking spray will usually work well. I must caution though…cooking sprays can be flammable so this is not a good idea near something that may have sparks, open flames or high amounts of friction. Oh, and I now never buy butter flavor cooking spray…just in case. :)
Everything about it is customizable to your event…the colors, the style of holder (can be vase, mug, pencil cup…whatever you choose). The pom can easily be removed and you are still left with a pen or pencil. After a quick look for pricing (no comparison shopping), you can make 96 pom favors on personalized pencils to fit into 12 centerpieces (that would be 12 tables/8 guests per table) for $82.00. Again, I said this is without comparison shopping, using any deals or anything like that. That comes down to $6.83 per centerpiece which includes favors per eight person table. Prices were based on WalMart for tissue paper, Oriental Trading Company for personalized pencils, craft store/dollar store for vases, ribbon and rubber bands.
I refuse to buy poms because I know how easy and cheap they are to make. Not to mention, you still have to put them together anyway when you buy pre made ones...they do not come already 'fluffed'. So here is a tutorial on how to make your own poms and some ideas for what to do with them. Half PomHalf poms have so many possible uses, I cannot list them all. But for starters, they can be added to ribbon for a beautiful sash, used in center pieces, favor box toppers and bridal car decorations. Poms can be made out of paper, plastic or cloth…in my examples I have used white toilet paper (awesome for this project if the poms are for indoors), tissue paper, and the advertisements from a sunday newspaper. In the past, I have used super cheap plastic table cloth with no backing to make poms for the bridal car (so they would be water resistant). Any result, when you are finished, pull the ends of each stack together to make a 'cross' or 'x'. An you are now right where you would be if you bought them pre-made.
Full PomThese poms are great for flower girls to carry as well as for decorations. You can hang them or place them on a vase and let the ribbon dangle and collect inside. I tied a ribbon loop around the middle instead of rubber band. And when pealing or fluffing, after I pealed about 4 layers, I flipped the pom over and started again on the bottom. I did a quick price check, just one 15" ball, to buy pre-made is $9-15 plus shipping…and you do most of the work anyway. You can make up to a 20" ball for $3 or less! See my post Functional Centerpiece/Favor for a fantastic idea on how to make a beautiful centerpiece and favors for many events including personal or business parties, showers, or even weddings.
Ok…here is an easy craft to make for or with any princess. This one's just so cute and simple I had to share immediately. This napkin fold is pretty cute. I don't know if I will ever get a chance to use it though. While I was checking out how to videos, I found several on creative folding of napkins. So here's my next share…this ones called "Eagle's Nest". Benefits and tricks:
|
Archives
July 2015
AuthorMy name is Jennifer. I am an ex-career woman, mom and owner/creator of JLO Specialties. Categories
All
|